Cpu майнинг монеро
Быстрый заработок. Майнинг Monero при помощи CPU на тестовом VDS.|Основы майнинга / Вопросы от новичков
Всем привет! Как и обещал, начну серию статей о том, как начать майнить и получать небольшой профит уже в первый месяц. Эта статья подойдет для тех, кто только вошел в сферу крипты и хочет получить базовые знания о самом процессе добычи монеток.О Monero (XMR)
Вырезка из википедии:
Monero (от Monero — «монета») — криптовалюта на основе протокола CryptoNote, ориентированная на повышенную анонимность транзакций.
Криптовалюта появилась 18 апреля 2014 года как форк Bytecoin (не путать с Bitcoin). Когда выяснилось, что более 80 % от максимального количества Bytecoin уже распределены, сообщество приняло решение о перевыпуске под названием «Monero», начав с нулевым предварительным майнингом.
XMR начала свой взлет еще в августе 17 года, когда валюта скакнула с 48 $ до 108$ и постоянной динамике жаркой осенью прошлого года она доросла в пике до 475$. На данный момент ее курс варьируется от 290 до 400 долларов USA.
Сложность майнинга составляет - 76,419,812,458.
Рыночная капитализация - $4,923,437,946.93
Дальнейшие перспективы роста неизвестны, но монета вполне обнадеживает.
Пул для майнинга
В качестве пула для майнинга я выбрал https://ru.minergate.com. Разрабы хорошо постарались и сделали софт, как для OS Win, так и для OS Linux, на чем и будем майнить.
Почему Linux?
Я тестировал майнинг и на Win, и на Linux. У второго показатели по майнингу выше процентов на 20-40. Линукс меньше отжирает ресурсов всего сервера, благодаря чему остается больше мощности для работы, а в нашем случае - для майнинга. К тому же, Linux не всегда палят админы серверов, что позволяет создавать больше машин под фейковыми аккаунтами.
Так же, обратил внимание, что техподдержка хостинга чаще отказывает в предоставлении тестового сервера на OS Win нежели, чем на Lin.
Под Linux выбираем систему ubuntu 16.04. Под нее заточен софт от Minergate.
Где брать тестовые VDS?
Примерно месяц я перебирал разные хостинговые компании. И со многими пришлось долго и занудно общаться на тему - зачем мне тестовый сервер и какое ПО я буду на него ставить. Остановился я на нескольких хостерах, а именно:
Спойлер: Хостер #1infobox_ru
- нужно общаться, применял навыки соц.инженерии. Спойлер: Хостер #2vps_ua
- дают сервера на месяц за символическую плату 60 р. В облаке я создавал 3 сервера и их ресурсов мне хватало до 6 дней. Спойлер: Хостер #3vdsina_ru
- дают сервак по акции: заплати 100 р. и 300 р. идет в подарок. На эти деньги можно взять один сервер и его хватит примерно на 28 дней. Рассмотрим пример создания сервера у этого провайдера.Есть список бесплатных тестовых VPS, но с ними есть нюансы: либо мощность маловата, либо палят софт майнергейта, либо мне уже их лень искать, так как бесплатным бывает сыр в мышеловке =)Да и за прошлый 2017 год хостеры озверели и многие просто перестали давать тестовые серваки на заляву. Поэтому я За условно бесплатную халяву.
Регаем фейковое мыло и создаем аккаунт
Я регал на mail.ru и на yandex.ru
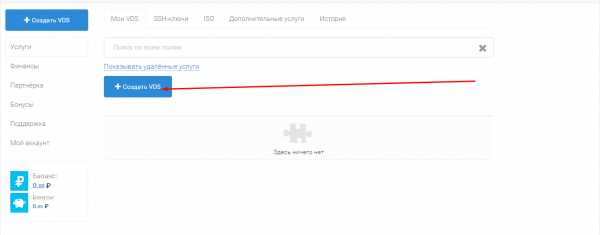
Далее топаем на сайт vdsina и создаем акк сразу на главной странице
 На ваш email придут данные о регистрации. Введите их в поле Вход. И вы попадаете в Панель управления. Сразу создаем сервер.

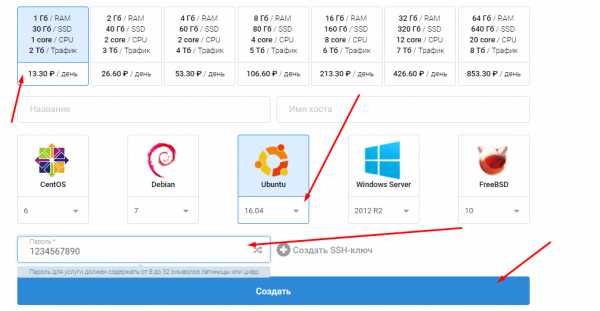
Как вы видете, мои юные майнеры, нам предлагается большое количество OS и конфиги самого сервера. Выбираем базовую конфигурацию с 1 ядром, чтобы сервера нам хватило на 28 дней. Ось берем Ubuntu 16.04. Вводим пароль и создаем сервер. Во всплывающем окне выбираете - Заказать, оплатить потом.
Далее, переходе к оплате сервера в разделе Финансы. Указываете 100 р и переходе к методам оплаты. Платите, как вам удобно. Самое забавное, что тут можно оплатить и с помощью BTC =)

Когда услуга будет оплачена, начнется создание сервера. Так как это Linux, то на создание сервера уйдет секунд 10-12. Данные для подключения придут к вам на ваш Email.
 Подключение к серверу
Далее, нам нужно подрубиться к серверу. Здесь подключение происходит посредством SSH. Для этого можете скачать хорошую прогу под названием mRemoteNG. Это софт на котором можно создавать и управлять десятками подключений, причем как по SSH, так и по RDP.
Когда запустили прогу создаете новое подключение, где прописываете:
Имя подключения - на Ваш выбор;IP - будет прислан на почту;Пользователь - для Linux, как правило, это root. Так же будет прислано на почту;Пароль - тот, который вы указали при создании сервера;Протокол - выберите SSH version 2;
И далее кликаете по подключению ПКМ и нажимаете Подключиться.
При подключении появится алерт. Нажимаете Да.

Поздравляю! Вы на сервере.
Minergate
Теперь же, зарегайтесь на майнергейте -- https://ru.minergate.com/. Но используйте Вашу рабочую почту, так как она будет логином при подключении майнинга на сервере. Процесс регистрации там простой, поэтому сможете разобраться самостоятельно.
Настраиваем майнинг на сервере
Это самая простая часть, как по мне. Здесь просто вставляете в командную строку сервера следующие директивы (вставить на линукс Shift+ins, либо ПКМ):
- sudo wget https://minergate.com/download/deb-cliкачаем софт
- sudo dpkg -i deb-cliраспаковываем софт
3. sudo apt-get updateАпдейт ПО сервера
4. sudo apt-get install screenУстановка screen
Теперь заходите в screen. Просто вводите команду screen, затем Enter, ну а далее Space.
5. Теперь остается прописать команду для старта майнинга. Выглядит она следующим образом
sudo minergate-cli -user {ВАШ[email protected]намайнергейте} -xmr 1
Укажите в этой строке Ваш email и запускайте майнинг. И начнутся раскопки!Вот такие цифры показывает мой сервер. Бывает больше, бывает меньше.

Если вы закрыли окно с подключением, то при следующем подключении введите команду screen -r и Вы увидите вновь процесс Вашего майнинга.
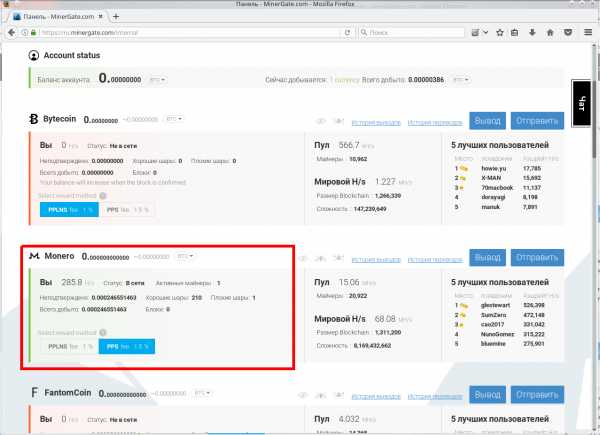
Теперь можете заняться своими делами и иногда проверять Ваш сервер, чтобы он не был выключен или заблокирован. Так же, вы можете наблюдать за количеством намайненного на сайте Майнергейта в разделе DashBoard.Рекомендую создавать еще сервера, чтобы раскопки были профитнее)
Надеюсь статья была полезна. Будут вопросы по железу пишите. И удачных Вам раскопок.
Далее, напишу статьи о майнинге на OS Win и браузерном майнинге. Дальше - интереснее. =)
Живите долго и процветайте! ©
cc-mining.ru
Быстрый заработок. Майнинг Monero при помощи CPU на тестовом VDS.|Основы майнинга / Вопросы от новичков
Всем привет! Как и обещал, начну серию статей о том, как начать майнить и получать небольшой профит уже в первый месяц. Эта статья подойдет для тех, кто только вошел в сферу крипты и хочет получить базовые знания о самом процессе добычи монеток.О Monero (XMR)
Вырезка из википедии:
Monero (от Monero — «монета») — криптовалюта на основе протокола CryptoNote, ориентированная на повышенную анонимность транзакций.
Криптовалюта появилась 18 апреля 2014 года как форк Bytecoin (не путать с Bitcoin). Когда выяснилось, что более 80 % от максимального количества Bytecoin уже распределены, сообщество приняло решение о перевыпуске под названием «Monero», начав с нулевым предварительным майнингом.
XMR начала свой взлет еще в августе 17 года, когда валюта скакнула с 48 $ до 108$ и постоянной динамике жаркой осенью прошлого года она доросла в пике до 475$. На данный момент ее курс варьируется от 290 до 400 долларов USA.
Сложность майнинга составляет - 76,419,812,458.
Рыночная капитализация - $4,923,437,946.93
Дальнейшие перспективы роста неизвестны, но монета вполне обнадеживает.
Пул для майнинга
В качестве пула для майнинга я выбрал https://ru.minergate.com. Разрабы хорошо постарались и сделали софт, как для OS Win, так и для OS Linux, на чем и будем майнить.
Почему Linux?
Я тестировал майнинг и на Win, и на Linux. У второго показатели по майнингу выше процентов на 20-40. Линукс меньше отжирает ресурсов всего сервера, благодаря чему остается больше мощности для работы, а в нашем случае - для майнинга. К тому же, Linux не всегда палят админы серверов, что позволяет создавать больше машин под фейковыми аккаунтами.
Так же, обратил внимание, что техподдержка хостинга чаще отказывает в предоставлении тестового сервера на OS Win нежели, чем на Lin.
Под Linux выбираем систему ubuntu 16.04. Под нее заточен софт от Minergate.
Где брать тестовые VDS?
Примерно месяц я перебирал разные хостинговые компании. И со многими пришлось долго и занудно общаться на тему - зачем мне тестовый сервер и какое ПО я буду на него ставить. Остановился я на нескольких хостерах, а именно:
Спойлер: Хостер #1infobox_ru
- нужно общаться, применял навыки соц.инженерии. Спойлер: Хостер #2vps_ua
- дают сервера на месяц за символическую плату 60 р. В облаке я создавал 3 сервера и их ресурсов мне хватало до 6 дней. Спойлер: Хостер #3vdsina_ru
- дают сервак по акции: заплати 100 р. и 300 р. идет в подарок. На эти деньги можно взять один сервер и его хватит примерно на 28 дней. Рассмотрим пример создания сервера у этого провайдера.Есть список бесплатных тестовых VPS, но с ними есть нюансы: либо мощность маловата, либо палят софт майнергейта, либо мне уже их лень искать, так как бесплатным бывает сыр в мышеловке =)Да и за прошлый 2017 год хостеры озверели и многие просто перестали давать тестовые серваки на заляву. Поэтому я За условно бесплатную халяву.
Регаем фейковое мыло и создаем аккаунт
Я регал на mail.ru и на yandex.ru

Далее топаем на сайт vdsina и создаем акк сразу на главной странице
 На ваш email придут данные о регистрации. Введите их в поле Вход. И вы попадаете в Панель управления. Сразу создаем сервер.

Как вы видете, мои юные майнеры, нам предлагается большое количество OS и конфиги самого сервера. Выбираем базовую конфигурацию с 1 ядром, чтобы сервера нам хватило на 28 дней. Ось берем Ubuntu 16.04. Вводим пароль и создаем сервер. Во всплывающем окне выбираете - Заказать, оплатить потом.

Далее, переходе к оплате сервера в разделе Финансы. Указываете 100 р и переходе к методам оплаты. Платите, как вам удобно. Самое забавное, что тут можно оплатить и с помощью BTC =)

Когда услуга будет оплачена, начнется создание сервера. Так как это Linux, то на создание сервера уйдет секунд 10-12. Данные для подключения придут к вам на ваш Email.
 Подключение к серверу
Далее, нам нужно подрубиться к серверу. Здесь подключение происходит посредством SSH. Для этого можете скачать хорошую прогу под названием mRemoteNG. Это софт на котором можно создавать и управлять десятками подключений, причем как по SSH, так и по RDP.
Когда запустили прогу создаете новое подключение, где прописываете:
Имя подключения - на Ваш выбор;IP - будет прислан на почту;Пользователь - для Linux, как правило, это root. Так же будет прислано на почту;Пароль - тот, который вы указали при создании сервера;Протокол - выберите SSH version 2;
И далее кликаете по подключению ПКМ и нажимаете Подключиться.
При подключении появится алерт. Нажимаете Да.

Поздравляю! Вы на сервере.
Minergate
Теперь же, зарегайтесь на майнергейте -- https://ru.minergate.com/. Но используйте Вашу рабочую почту, так как она будет логином при подключении майнинга на сервере. Процесс регистрации там простой, поэтому сможете разобраться самостоятельно.
Настраиваем майнинг на сервере
Это самая простая часть, как по мне. Здесь просто вставляете в командную строку сервера следующие директивы (вставить на линукс Shift+ins, либо ПКМ):
- sudo wget https://minergate.com/download/deb-cliкачаем софт
- sudo dpkg -i deb-cliраспаковываем софт
3. sudo apt-get updateАпдейт ПО сервера
4. sudo apt-get install screenУстановка screen
Теперь заходите в screen. Просто вводите команду screen, затем Enter, ну а далее Space.
5. Теперь остается прописать команду для старта майнинга. Выглядит она следующим образом
sudo minergate-cli -user {ВАШ[email protected]намайнергейте} -xmr 1
Укажите в этой строке Ваш email и запускайте майнинг. И начнутся раскопки!Вот такие цифры показывает мой сервер. Бывает больше, бывает меньше.

Если вы закрыли окно с подключением, то при следующем подключении введите команду screen -r и Вы увидите вновь процесс Вашего майнинга.
Теперь можете заняться своими делами и иногда проверять Ваш сервер, чтобы он не был выключен или заблокирован. Так же, вы можете наблюдать за количеством намайненного на сайте Майнергейта в разделе DashBoard.Рекомендую создавать еще сервера, чтобы раскопки были профитнее)
Надеюсь статья была полезна. Будут вопросы по железу пишите. И удачных Вам раскопок.
Далее, напишу статьи о майнинге на OS Win и браузерном майнинге. Дальше - интереснее. =)
Живите долго и процветайте! ©
cc-mining.ru
Monero Mining - How to Mine Monero on Windows with CPU & GPU
Hey, what sup ? I have seen in some places people asking about Monero and how to mine it, if you don’t know much about it, Monero is a secure, private, untraceable currency. It is open-source and freely available to all. You can read all about it right here, or watch video below.
Today i’m going to show you how to mine Monero coin on Windows / Linux with CPU and AMD / nVidia GPU.
AMD video cards are the perfect choice to mine Monero but i will show you examples for both AMD and nVidia cards.
UPDATED Thursday, September 21, 2017: How to mine Monero (XMR) with GPU has been updated, click here for tutorial, this time i sued Claymore’s CryptoNote GPU Miner v9.7
Recommended Hardware for Monero (XMR) Mining Rig
Here we go! I will start mining Monero with CPU
Monero CPU Mining 1 First step is to download the miner, i will be using Claymore’s CryptoNote Windows CPU Miner v3.5, download it from here , read more about the miner here 2 Once downloaded extract the contents in a folder and access it. 3 Then open “pool 32bit.bat” or “pool 64bit.bat” (depends what windows version you have) with notepad and paste the following code: “NsCpuCNMiner64 -o stratum+tcp://monerohash.com:3333 -u YOUR_WALLET_KEY_HERE -p x -t 4” , don’t forget to replace your wallet key. If you don’t have one it can be generated from your kraken.com account. 4 Now open the “pool 32bit.bat” or “pool 64bit.bat”, in my case ill open “pool 64bit.bat” because i have 64bit windows version. If you notice a message like “CANNOT ALLOCATE MEMORY!” and “SLOW MODE WILL BE STARTED IN 15 SECONDS…” you must do the following steps: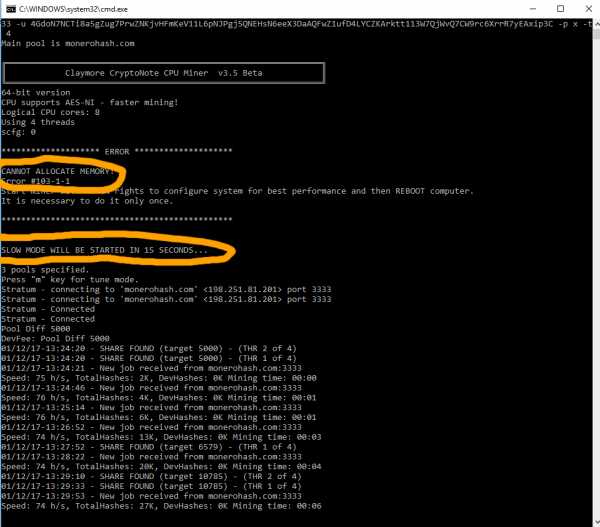
-
- Create shortcut for NsCpuCNMiner64.exe on desktop, you must be logged as admin aswel
- Open shortcut properties
- On “Target” location at the end of the line “C:\Users\USER\Desktop\Claymore CryptoNote CPU Miner v3.5 Beta – POOL\NsCpuCNMiner64.exe” add this “-o stratum+tcp://monerohash.com:3333 -u YOUR_WALLET_KEY -p x -t 4“, full code line should look like this “C:\Users\oneill\Desktop\Claymore CryptoNote CPU Miner v3.5 Beta – POOL\NsCpuCNMiner64.exe” -o stratum+tcp://monerohash.com:3333 -u YOUR_WALLET_KEY -p x -t 4
- Then Click on “Advanced” button, check “Run as Administrator” box, apply and save modifications.
- Now you will have to start the miner from desktop shortcut, you will still see the same error messages, just leave the miner to run for 2-3 minutes then close it and reboot your computer.
-t 4 stands for number of threads to use while mining. I have an i7-3610QM and i can go up to 8 threads, but as i understood -t 4 is the best option.
After the restart you will notice a new message saying “FAST MODE ENABLED”
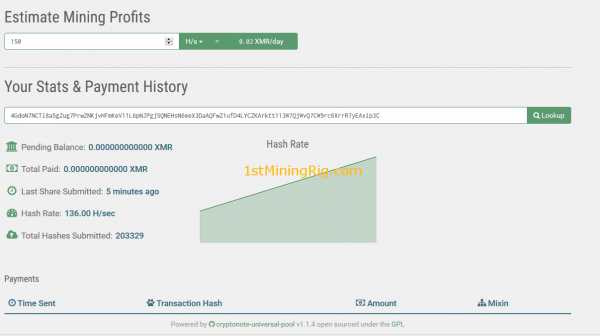
5 That’s it, you can check mining progress here https://monerohash.com/ at the bottom of the page add your wallet key and click “Lookup”, then it will show your mining hashrate, balance etc..Here is mine:
For this test i will be using my laptop, the vide card is nVidia Geforce GTX 670M 3GB.
1 Will use ccminer-cryptonight (A modification of Christian Buchner’s & Christian H.’s ccminer project by tsiv for Cryptonight mining.). You can download it from https://github.com/tsiv/ccminer-cryptonight/releases 2 Once downloaded, extract its contents 3 Send a desktop shortcut of Right click of “ccminer.exe” by right clicking it and then choose “Send to” -> “Desktop” 4 On desktop shortcut that we have just created right click on it and go to properties 5 In target field paste the following code -o stratum+tcp://monerohash.com:3333 -u YOUR_WALLET_KEY -p x, paste it right after “C:\Users\monero\Desktop\monero nvidia\ccminer.exe”, so the full code will look exactly like this “C:\Users\monero\Desktop\monero nvidia\ccminer.exe” -o stratum+tcp://monerohash.com:3333 -u YOUR_WALLET_KEY -p x 6 Now click on “Advanced” and check the box that is saying “Run as Administrator” 7 Apply and save the modification and then you can close it. 8 Now double click the shortcut and watch the mining starting 🙂 , done! Monero AMD GPU MiningHow to mine Monero (XMR) with Claymore’s CryptoNote GPU Miner v9.7
For me Claymore’s CryptoNote GPU Miner is the best miner for Monero, here is a quick tutorial how to use it.
- First download the miner from https://mega.co.nz/#F!e4JVEAIJ!l1iF4z10fMyJzY5-LnyC2A
- Once downloaded extract its contents and right click on start.bat file and then go to edit
- As Monero pool i recommend nanopool or dawrfpool, in this example ill use dawrfpool
- Inside the start.bat file paste the following code:
- GPU_FORCE_64BIT_PTR 0GPU_MAX_HEAP_SIZE 100GPU_USE_SYNC_OBJECTS 1GPU_MAX_ALLOC_PERCENT 100GPU_SINGLE_ALLOC_PERCENT 100NsGpuCNMiner.exe -o stratum+tcp://xmr-eu.dwarfpool.com:8050 -u WALLET_ADDRESS.Rig1 -p x
- Replace WALLET_ADDRESS with your personal Monero payment address
- If you want to control the fans directly from miner’s .bat file, you can add right after -p x the following -tstop 85 -tt 65 -fanmin 60 -fanmax 100, also you can control the clocks and voltage, all you have to do is to use the following commands: for setting up the clocks -clock (core clock) and -mclock (memory clock), as for undervolting -cvddc (core clock) and -mvddc (memory clock). This time i am using a rig of 5x Sapphire Nitro+ RX 470 4gb and the command line will look like this -cclock 1130 -mclock 2100 -cvddc 875 -mvddc 900 (note that you still have to find the best clocks and udnervolt for your rig, this is how mine works the best)’
- Finally the whole command line will look like this NsGpuCNMiner.exe -o stratum+tcp://xmr-eu.dwarfpool.com:8050 -u WALLET_ADDRESS.Rig1 -p x -tstop 85 -tt 65 -fanmin 60 -fanmax 100 -cclock 1130 -mclock 2100 -cvddc 875 -mvddc 900 (don’t miss the GPU allocations from above)
- That’s it, double click start.bat file to start mining
I will not be able to post my results because i don’t have a AMD GPU card to mine, i will only show you how to do it.
1 Download the mining software, this time we will be using Wolf’s OpenCL XMR Miner for AMD GPUs 2 Extract the contents from archive 3 Now open “xmr.conf” file with notepad. Hold “SHIFT” button then right click on “xmr.conf” and you will see at the top a new line “Open with“, click on that and then select “Notepad” 4 Once xmr.conf is open in notepad look for “url” and change current pool url to “stratum+tcp://monerohash.com:3333” , then look for “user” and change the wallet key with yours.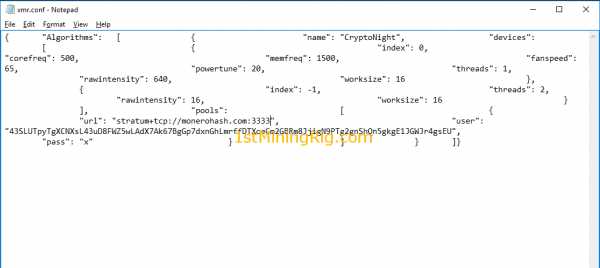
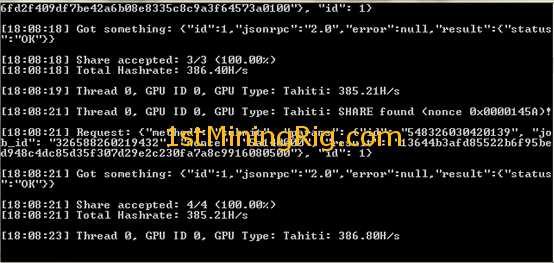
Make sure you adjust you proper settings to xmr.conf file and also read carefully readme file !
Have fun!
Thank you for reading. As always, your comments, suggestions and questions are welcome.
Subscribe and stay tuned for further updates!
Found this useful? Buy me a beer 🙂
ETH: 0x8a159cc27454130ee4880504f4d2afe2ebb22d15
BTC: 3DWC5xaaapSRmccAvv12dF3nsRYqx3Y1YM
ZEC: t1T9dLLM14Jh6NNuCPfNsRgGnj58LkT3yYX
1stminingrig.com
How to mine Monero | CryptoCompare.com
Antonio Madeira 28 Sep 2017Monero (XMR) is a Cryptonote algorithm based cryptocurrency, it relies on Ring Signatures in order to provide a certain degree of privacy when making a transaction. Monero is a Proof of Work cryptocurrency that can be miner with computational power from a CPU or GPU. There are currently no ASICs for Monero, which means that anyone with a computer can mine it.
The first thing you need to think about is if you are going to mine solo or on a pool. Mining on a pool usually comes with a fee but also has it's advantages. Users that don't have enough computational power may have to wait long periods of time before getting a reward, in a pool users pull their efforts together in order to reduce variance and have a steady flow of income. Users that have enough hardware or simply want to mine solo can also benefit from solo pools which function in the same way as normal solo mining, but don't require users to run a full node or store the entire blockchain. We are going to use MoneroHash for this guide, but you can use any pool you like.
Take a look at our Mining Pools section to compare pool features, fees and reviews.
Today we're going to show you how to mine Monero on a Mining Pool.
AMD Graphic cards are optimal for Monero Mining, but you can also mine it with a Nvidia GPU or CPU. To allow users to get the most profit for their specific hardware we will use a different software that was created for each of this options.
Part 1 - CPU Mining
Step 1: Download the mining software. For this section of the guide we are going to use Wolf's CryptoNote open souce CPU Miner, since it's the one that has the provides the best results. You can find download link here.
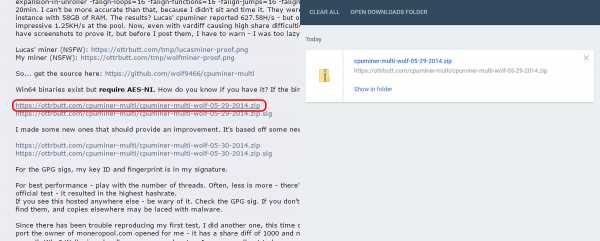
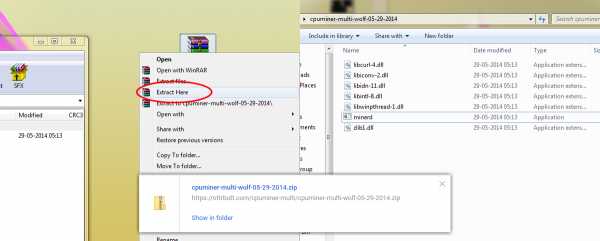
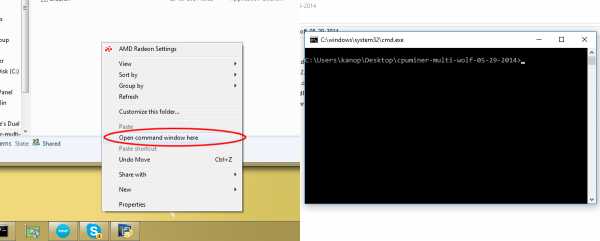
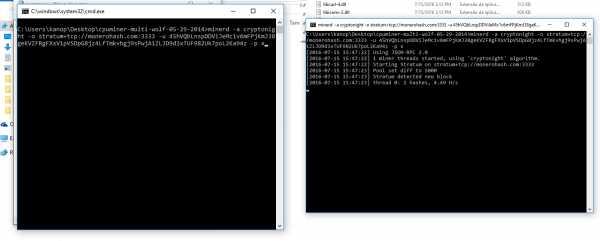
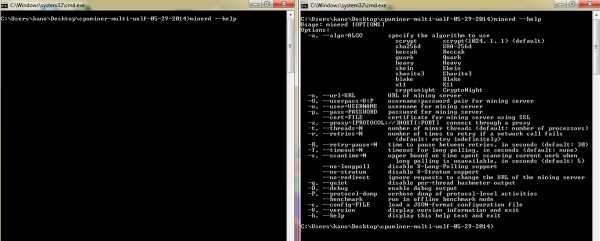
You are now mining Monero! You can view all of the commands available by typing "minerd --help". In our case we're just using the -a command, which stands for algorithm, the -o stands for server, the -u is your wallet address and the -p is your password, which can be left with an x when the Mining pool does not require you to login.
Part 2 - AMD GPU Mining
Step 1: Download the mining software. For this section of the guide we are going to use Wolf's CryptoNote open souce AMD GPU Miner, since it's the one that has the provides the best results. You can find the Download link here.
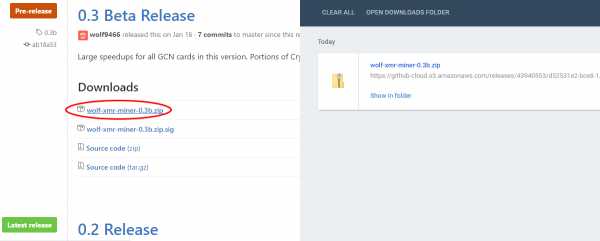
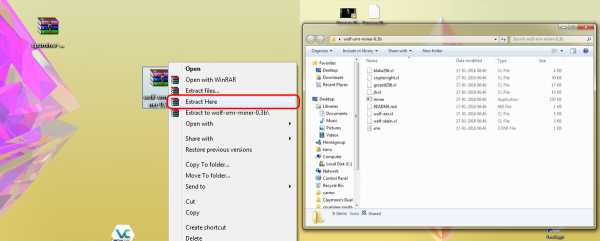
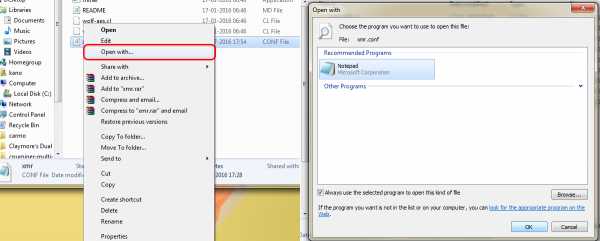
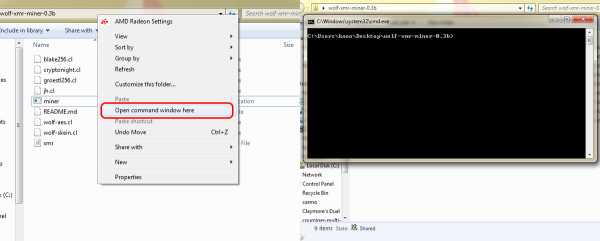
Step 5: Now that our command line window (miner) is ready to go, all we need to do is point the miner to the xmr.conf file. type: "miner xmr.conf"
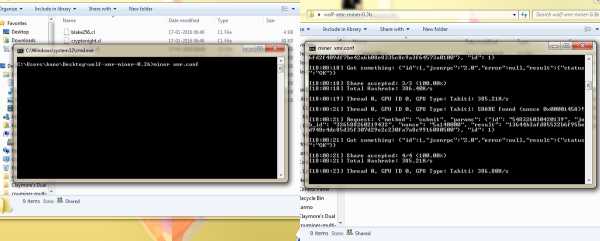
And that's it, you are now mining with your AMD GPU, which will surely give you the best results when mining XMR. If you get a "clCreateBuffer" error, lower your raw intensity in the xmr.conf file:"rawintensity": 1336
Part 3 - Nvidia GPU Mining
Step 1: Download the mining software. For this section of the guide we are going to use CCMiner version forked by tsiv, since it's the one that has the provides the best results when mining with Nvidia Graphic Cards. You can find download link here.
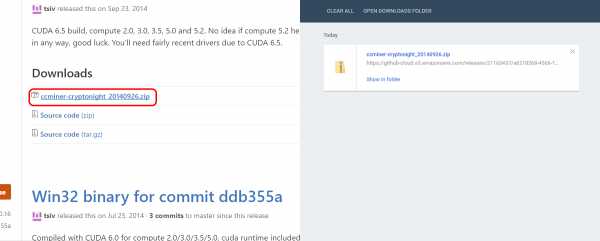
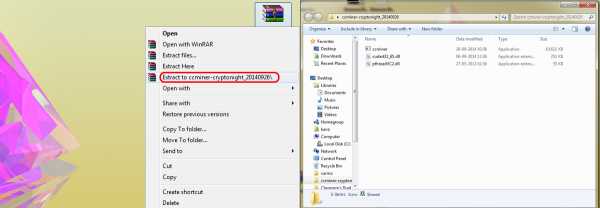
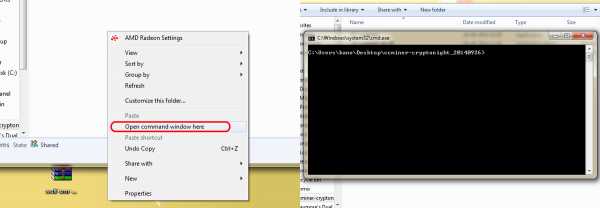
That was the last step. You are now mining Monero with your Nvidia Graphic Card. As you can see, mining Monero is possible with any hardware, even a CPU! So why not give it a try?
Part 4 - Easy Mining with any hardware
In this section we'll use Minergate, an easy to use cryptocurrency miner that allows you to mine several cryptocurrencies with a single click!
Step 1:The first thing you’ll need is an account on www.minergate.com. MinerGate has its own built-in wallet in order to allow users to start mining even if they don’t have a wallet address set up, so in order to protect your funds, we advise using a strong password and activating 2FA (2 factor authentication), 2FA will make sure no one can acess your funds even if they know your password. Remember, the safest place to store your funds is in your own wallet. Step 2: Next you need to download the Mingergate software and install it, the website will detect your operating system and present you with the correct version. Install and run MinerGate. Step 3: After you open and install the setup, you’ll be presented with the option to start smart mining. MinerGate automatically detects your equipment and chooses the most profitable cryptocurrency to mine according to your hardware, market price and difficulty. For most computers this will be Monero, so you can click "Start smart mining".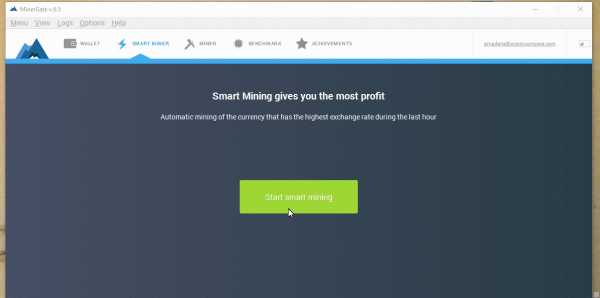
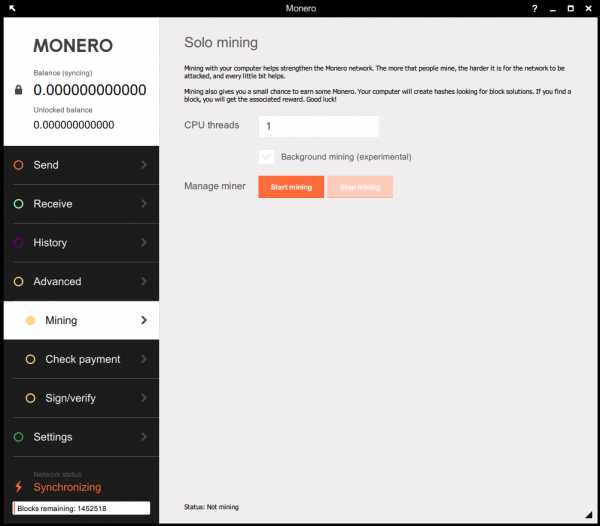
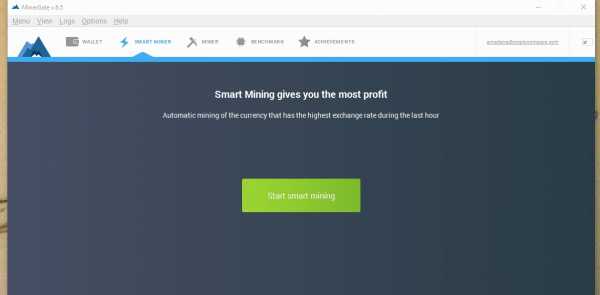
You can choose how many cores you want to use in your CPU and GPU, if you have one. If smart mining takes you to another cryptocurrency, you can always choose monero manually, as so:
That's it. Easy, right? Minergate prouds itself on being so! And you can use their GUI miner for other cryptos like Ethereum and Ethereum Classic. Good luck!
www.cryptocompare.com

